Google Apps Script Power Up
Why Write GAS Code Locally?
When it came out, the new Google Apps Script IDE was, of course, a big deal. It’s way better than the legacy one. It brought syntax highlighting, keyboard shortcuts, command palette and just a much better UI experience.
In fact the reason it’s so good is that it’s built on top of VS Code Monaco editor. But it’s definitely still far away from what a real VS Code installation can do. You can get all the functionality of the online IDE and much more more: autocomplete, custom themes, installation of modules, linting, snippets, etc.
The bare minimum that you would need is :
- A VS Code installation (duh!)
- Node.js + NPM : a JavaScript runtime with a built-in module installer;
- Autocomplete;
- clasp: a CLI utility to sync your GAS code
Let’s get into it!
Installing Node.js and NPM
Node.js is a JavaScript runtime environment built for running JavaScript on the server. It also comes with NPM, a package manager that allows us to install additional packages. This allows easy access to development tools. If you want to learn more about Node.js, check out the Overview of Node.js by Yushida SJ. To install Node.js, navigate to the official downloads page.
Installing Autocomplete for Google Apps Script
Now that we have Node.js and NPM installed, let’s run the following command to install autocomplete:
npm install --save @types/google-apps-script
Once this is done, create a new file, make sure you select JavaScript as the language (or create a file with the .js extension), and enter import ‘google-apps-script'; at the top. Congrats, you now have Google Apps Script autocomplete in your IDE
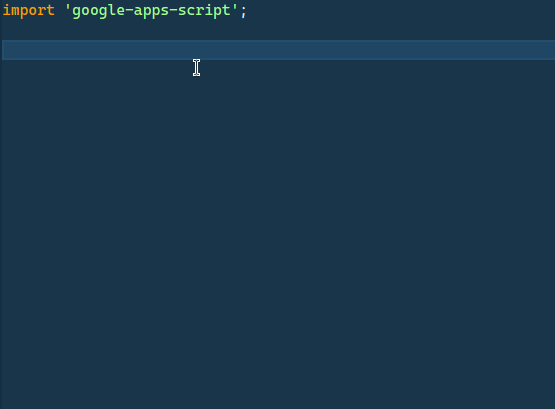
Important note: as Google Apps Script doesn’t currently support node modules, if you include the import ‘google-apps-script’; line in the files you push to your Google Apps Script project, GAS will throw an error. In reality you want to have a separate file with this import statement that you want to keep open in VS Code, but you also want to avoid pushing it to your GAS project by adding it to the .claspignore file (more on that below).
Enabling the Google Apps Script API
Before we install and use clasp, we need to enable the Google Apps Script API because that’s what clasp uses in the background. Navigate to the Apps Script Settings page, click on “Google Apps Script API” and toggle the switch to “on”.
Installing clasp
The Command Line Apps Script Projects utility, or clasp, is a terminal app that allows you to deploy your GAS code that you wrote locally. This is the tool that makes local development possible.
To install clasp, open your terminal and run this command:
npm i @google/clasp -g
That’s all it takes.
The four commands to master in clasp are:
clasp loginclasp cloneclasp push -wclasp pull
clasp login allows you to save your client credentials using Google SSO. This command will open a browser tab where you will need to login with your Google account.
Once you created a project, you can find its ID in the settings tab like so:
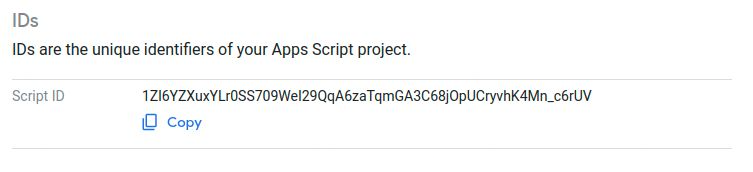
To clone this project, first copy the script ID by clicking the “copy” link. Now in your terminal (I prefer to use the integrated terminal in VS Code for this) navigate to your project folder and type in:
clasp clone
This will clone the existing files to your machine. It will also create a .clasp.json file, where the script ID will be stored.
You will notice that the file extensions are .js rather than .gs. That’s fine, clasp handles the conversion between the two extensions automatically.
Once you write some code, you can deploy it with the clasp push command. Most of the time I add the -w option like so: clasp push -w.This option stands for “watch”, it allows clasp to push the code every time you save the file you’re working on so that you don’t have to run the clasp push command every time.
Similarly there is a clasp pull command. If you or your team mate updated your script in the online IDE rather than on your machine, you can pull the changes and it will update your local files.
Optionally you can also create a .claspignore file. All files listed in .claspignore will not be pushed. As mentioned above, it’s a good idea to add the file that contains the import ‘google-apps-script'; statement to avoid errors.
clasp can do more advanced things like creating stand-alone or bound scripts, deploying web apps, etc., but I will cover that in a future article.Let me know in the comments if that is something that is of interest.
Let’s Create a “Hello World” Example with clasp
First of all let’s create a new script by typing script.new in the address bar in your browser. Then navigate to the settings and copy the script ID as explained above. After that in VS Code’s built-in terminal create a project folder and navigate there by typing:
mkdir hello-world/
cd hello-world/
Now you’re ready to clone the script. Type clasp clone, press the space bar and then Ctrl+Shift+V to paste the script ID and press enter.
Once the files are cloned on your computer, open the Code.js file in VS Code, remove all its contents and create the following function:

Save the file and type clasp push in the terminal. Once the files are pushed, navigate to the script editor in the IDE and refresh the tab, you will see that your code has been deployed.
Congrats, you’ve mastered the basics of clasp!
Let’s now briefly discuss what other advantages of developing locally are.
The Power of Node.js Coupled With Google Apps Script
Developing locally is not only more convenient, it is also more powerful. I mentioned before that GAS does not support Node.js modules, however, you can use Webpack to bundle the modules and include them in your scripts. If you are interested in learning more about this, mention it in the comments and I will write a separate article on this topic if there is interest.
Taking VS Code to a New Level With Extensions
One other advantage of local development is of course that you can personalize VS Code with extensions. My go-to extensions are:
- jshint: a linter for JavaScript
- Prettier: an amazing code formatter that makes my code neat and readable
- Quokka: for executing code snippets inside VS Code
- Cobalt2 Theme
Some other extensions that I use are:
- Better Comments
- Bracket Pair Colorizer
- Bookmarks
- Git Graph
- Git Lens
- Live-Server
I recently also got access to GitHub Copilot, an AI-powered autocomplete tool that is a VS Code extension. It works extremely well with Google Apps Script and will definitely be a subject of a future article.
Other Tools to Consider
Once you start developing locally, it’s a great opportunity to start using other tools.
Git
Git is the world’s most used open source version control software. Detailed explanation of git is outside of the scope of this article, but any serious project requires the use of git, especially if you are not the only developer. The Chrome add-on for GitHub just doesn’t cut it, you want to be able to use the command line for full functionality (or even some VS Code extensions that will provide some GUI for git).
Git works really well with clasp, as you can switch branches and deploy any version of the code that you want tested.
Postman
Postman is a tool for testing APIs and is a great fit to test web apps written in Google Apps Script.
Conclusion
Any serious GAS developer should, IMHO, at one point migrate to local development with clasp. It’s more convenient and more powerful thanks to the tools that come with VS Code and Node.js.
About Me
I am a full-time Google Workspace and Google Cloud Platform developer, and the Founder of Wurkspaces.dev. Hire me.