No rooting or custom modifications needed, we’re going to do this with stock Android and a few free (but high-quality) apps.
I’m not even going to address the “Yeah… but why?”, because if you’ve found this article I know your reasoning (not unlike mine) falls beyond typical reasoning… So let’s dive in!
What you’ll get:
- Windows XP Home or Pro running on your phone, 32-bit (not tested with 64-bit, and I’m sure you’d need to tweak things a bit)
- Optional multi-core running in XP (but don’t expect it to boost your performance)
- A filesystem mount between XP and your phone
- Working networking/internet (but good luck with IE)
- Maybe working sound (when it did work for me, it was very choppy)
- Not enough video capabilities to play the OG Starcraft (But you can play Pinball and Solitaire!)
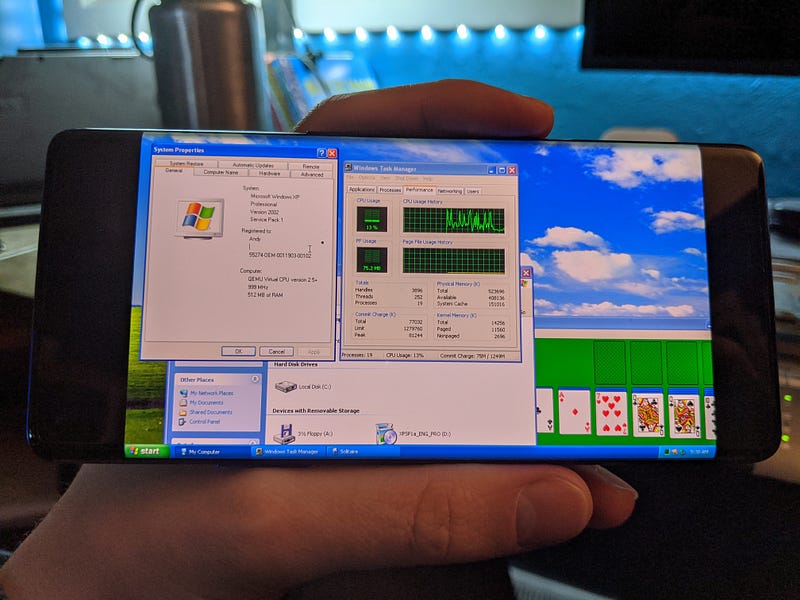 XP Running on the OnePlus 8 Pro
What you’ll need:
- A modern-ish Android phone (Tested on Pixel 2 and OnePlus 8 Pro)
- Android 10 (although go ahead and try it with older versions, I see no reason why it wouldn’t work)
- Windows XP install ISO CD image
- 10 or so GB free on your phone (adjust to taste)
Step 1: Getting Setup
First, you’ll need the apps. We’re using a tool called Termux as our host platform, install it here: https://play.google.com/store/apps/details?id=com.termux&hl=en_US
You’ll also need a VNC Viewer app, to view the Windows XP screen I recommend VNC Viewer: https://play.google.com/store/apps/details?id=com.realvnc.viewer.android&hl=en_US
Find or download your favorite backup of the Windows XP install ISO. I can’t provide that for you, but there are many areas on the internet where you can grab a copy. Get it in ISO format, and copy/download it to your Android’s “downloads” folder.
The following Android keyboards are recommended, but not strictly necessary. You should be able to accomplish everything with your default keyboard, you just might get a bit frustrated with the lack of arrow keys and easy access to less common buttons:
- https://play.google.com/store/apps/details?id=org.pocketworkstation.pckeyboard
- https://play.google.com/store/apps/details?id=com.microsoft.keyboardforexcel
(If you happen to have a bluetooth keyboard or USB adapter and USB keyboard that works with your phone, by all means, indulge.)
Step 2: Install Prep
Termux doubles as a terminal emulator and Linux package tool, which gives us a lot of flexibility on Android.
To run Windows XP, we’ll be using the Qemu Emulator. To install Qemu, open Termux and run the following commands:
pkg update -y
pkg install -y qemu-system-i386-headless qemu-utils
Connecting to Android storage
Since your Windows XP cd iso image is in your downloads folder, we need to configure termux to access directories in the wider Android, and not just it’s own scoped files. To do that we need to “setup storage” (https://wiki.termux.com/wiki/Termux-setup-storage)
It’s easy, simply run:
termux-setup-storage
Next, we’ll create the hard drive image that Windows XP will be installed on:
qemu-img create -f qcow2 WinXP.img 40G
The above command creates a 40 GB file image format that’s specific to Qemu (called qcow2, which stands for Qemu Copy On Write) while this isn’t as fast as raw images, it only consumes space as needed, instead of allocating all 40GB right away. The file produced is only about 193K, until we start filling it up 😉.
Step 3: Install Windows XP
With the above setup in place, let’s get the install started! Here’s the magic command that will get install underway:
qemu-system-i386 -m 512 -smp cores=4,sockets=2 -vnc :0 -drive file=WinXP.img,format=qcow2 -cdrom XPSP1a_ENG_PRO.iso -boot d
NOTE: You’ll need to adjust the -cdrom XPSP1a_ENG_PRO.iso to be the location of your ISO image, chances are it’ll be something like: ~/storage/downloads/xp.iso , or similar.
The above command will start our virtual machine with the empty hard drive and the XP install disk in the CD drive. To actually see and control the setup we now need to connect to the VNC output.
It should look like the command is stuck. The cursor will go to the next line, but not give you a new line $ This is exactly what we want. Qemu is now running.
Step 4: Connecting to XP
Switch over to the VNC Viewer and tap the ‘+’ to add a new connection:
Address: localhost:5900
Name: Windows XP
Save and connect, if all goes well you should now be greeted with the Windows XP installation screen:

Doesn’t it just bring back the memories?
Now go ahead and complete your install like you normally would. Like you have 1,000 times before.
One tip though: use the “Quick” formatting, since we’re not using a physical hard drive, a check isn’t needed.
After the initial install is finished, the VM will try to restart, but when Qemu notices the machine stops it will exit. Hop back over to Termux, remove the -cdrom XPSP1a_ENG_PRO.iso -boot d part of the command and start it back up. You’ll be able to finish the install and be welcomed by your new XP desktop.
Final Words: Getting the most out of your Windows XP
After XP is installed and up and running, I recommend tweaking a few of the Qemu settings. Here’s the command I use on the regular:
qemu-system-i386 -m 512 -drive file=WinXpPro.img,format=qcow2 -vnc :0 -smp cores=4,sockets=2 -netdev user,id=n0 -device rtl8139,netdev=n0 -drive file=fat:rw:storage/winxp,format=raw -soundhw pcspk,ac97
What it does:
- -m 512 sets your RAM to 512 MB
- -smp cores=4,sockets=2 Gives you 2 CPUs, each with 4 cores. Windows XP won’t let you add more than 2 sockets, but it doesn’t limit how many cores are per socket. (I haven’t really noticed any speed improvement over 1 core, but it makes me feel cool)
- -netdev user,id=n0 -device rtl8139,netdev=n0 configures your ethernet network device, allows XP to connect to the internet. (Which, ah, be careful? XP is not exactly an OS you want on the internet these days, use sparingly)
- -drive file=fat:rw:storage/winxp,format raw configures a shared folder from your Android device (that must exist at ~/storage/winxp) and mounts it as a drive in Windows XP. Note that it’s both fat, and raw, which means large files can’t be placed into it, not many files can be put in it, and once the VM is on, placing or moving files from the Android side in that folder will result in odd behavior. Use it with caution, and with extreme limitation, just to get files in and out of your VM.
- -soundhw pcspk,ac97 This will add both a PC Speaker (beep), and Intel AC97 sound card… I’ve had very limited success with both, but good on ya for trying too!
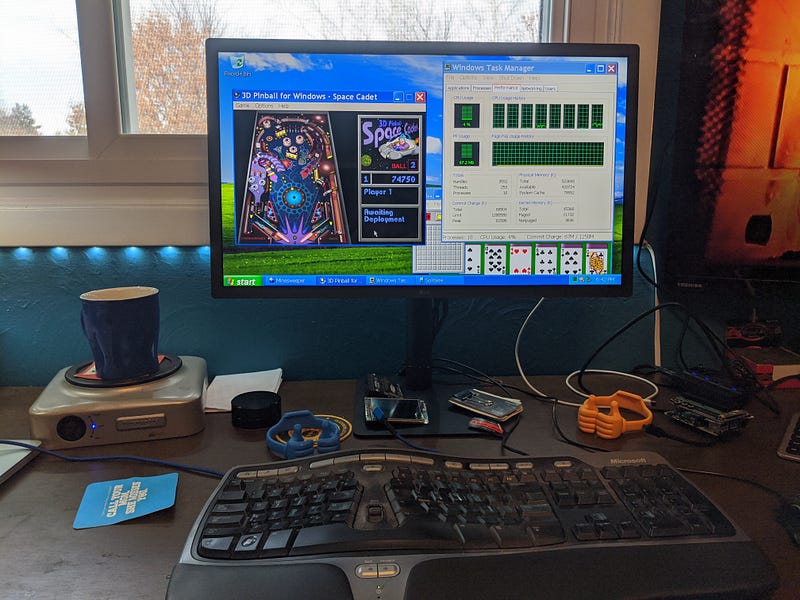 Connecting to the VNC connection from my Desktop-desktop, I’m able to remotely use the VM of Windows XP that’s running on my Pixel 2.
As you might have guessed, you can supply other ISOs for the -cdrom option after XP is up and running if you want to try and install and run your favorite classic game:
 Starcraft won’t work, the graphics card provided by Qemu just don’t cut it. But look! You can install it! (P.S. if you do want to play Starcraft, Blizzard lets you download and play it for free these days, check it out!)
Updating XP
If you happen to only have Service Pack 1 or 2 install disk, and are itching to get XP updated, you’ll quickly notice that Windows XP update tool doesn’t work anymore (and hasn’t worked for quite awhile). But fret not! Microsoft still hosts all of the old XP Service Pack update files (at least at the time of this writing they did): https://www.catalog.update.microsoft.com/Search.aspx?q=xp
 You can find pretty much every update you’ll want here.
Because SSL versions have moved on since XP, you may need to download these from Android, and move them to a folder that’s mounted as a drive in XP (see bigger/better qemu command above).
Enjoy with moderation!
Looking for something a bit more retro than XP? I wrote an article on how to do this with Windows 98 as well!